Quoted_Identifier in SSIS and removing Commas from the source data.

what would you do if you have this situation in the work you do in SSIS.

for example:

I have simple text file which has two columns, first is Name and City.

the file looks like this.

Capture

as you can see column city has values which contain Comma as well.

when you build SSIS package to load this type of data to the database, it will load the with the comma to your database.

for example.

Capture

when you connect with Flat file source you will get

Capture

here you can see the output from the flat file source.

now what should we do to remove this Commas from the values, so we can have the whole values.

Capture

what are we having in the middle Derived column transformation.

Capture

this is it.

I have two data viewers in my package, to check the values before the change and after the change.

the first data viewer will show the values.

Capture

and the second data viewer will show the result, which should be the updated one. without the Commas into the values.

Capture

There you go.

A data without the commas into the database.

Enjoy..

Ctrl + R in SSMS (SQL Server Management Studio)

After the successful installation of the SQL Server 2012, some shortcut keys can be possible to not work properly like in early versions, and one of the most shortcut key that I had problem after my installation of the SQL Server 2012 in the SSMS has been well known shortcut Ctrl+R to remove the last results pane from the SSMS!

These are few steps how to activate it in the new SSMS of SQL Sever 2012:

Select > Tools > Customize … click “Keyboard”

In the list window scroll down and find to select “Window.ShowResultsPane
Go to “Use new shortcut in:” – select “SQL Query Editor
Go to “Press shortcut keys” text box and press Ctrl+R
Click “Assign”

Short Currently used by: Select SQL Query Editor

and finally OK!

Now, when you execute a select statement in SSMS and you have results set, you can remove them, pressing Ctrl+R, that is very often used from the Developers and DBA to clear the results pane!

What are Constraints in SQL Server and Why we use them? PART 2

in this post we will talk the rest of the Constraints.which are4. Foreign Key

A FOREIGN KEY in one table points to a PRIMARY KEY in another table.

let me explain with the example.

we will use pid from PrimaryKeyExample table to create reference to ForeignKeyExample table.

in above image i have created table named ForeignKeyExample.
please have a look on CONSTRAINT section.
it referencing PrimaryKeyExample table with pid.
to create reference in ForeignKeyExample we need to have pid column which has exact datatype and definition.

how Foreign Key Constraint works?

lets say we have three records in PrimaryKeyExample table.

now the primary key column is pid which is referenced by ForeignKeyExample.
now lets add record into the ForeignKeyExample.

if you see the records of PrimaryKeyExample table, you can see three records.
table has three pid =1,2,3.we are trying to insert a record with pid = 7 which PrimaryKeyExample does not have.

we have inserted pid = 3. if you remember we have pid = 3 in PrimaryKeyExmaple.
so that’s why we were able to insert record with pid = 3.

Merge Statement in SQL Server to apply UPSERT (Update, Insert and Delete)

How many times we have got the situation where we have to build the logic in your code that checks for the existence of a row, then based on the outcome of that existence check you either perform an INSERT statement (if the row does not exist), or an UPDATE statement (if the row already exists?) with the release of SQL Server 2008 introduced the MERGE statement to make that task a lot easier. In this article I will be discussing how to perform inset, update and delete logic using the MERGE statement.

let’s start MERGE.
How it works:
the MERGE statement basically works as separate insert, update, and delete statements all within the same statement. You have to specify a “Source” record set, a “Target” table, and the join between the two.
You specify the type of data modification that is to occur when the records between the two data are matched or are not matched.
MERGE is very useful, especially when it comes to loading data warehouse tables, which can be very large and require specific actions to be taken when rows are or are not present.

Capabilities of MERGE Statement

the MERGE statement allows you to write code to determine how to compare two tables and then determine if an INSERT, UPDATE, and DELETE operations needs to be performed against one of the tables. The MERGE statement can also use the TOP clause to only perform a specific number of operations.
Like the normal INSERT, UPDATE and DELETE statements the MERGE statement can also output information so you can identify specifically what rows and values where inserted, updated and deleted.
Insert or Update Logic (UPSERT)

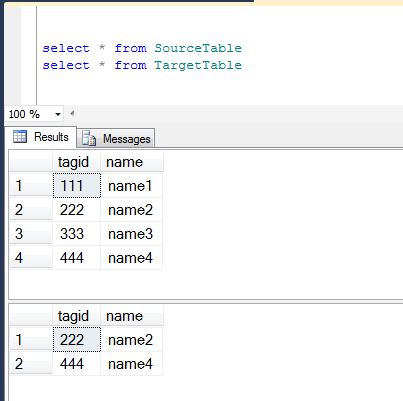
give example shows the MERGE statement to Insert or Update records in one table based on the records contained in another table.
These tables are identified to the MERGE statement as a “Source” and a “Target” table. The target is the table that will have records updated or inserted, whereas the source table contains the records that will be used by the MERGE statement to identify the records in the target table that will be updated or inserted.

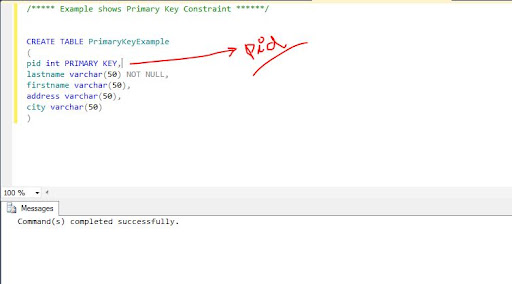
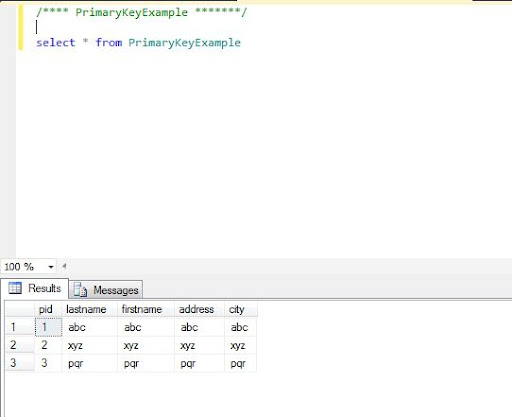
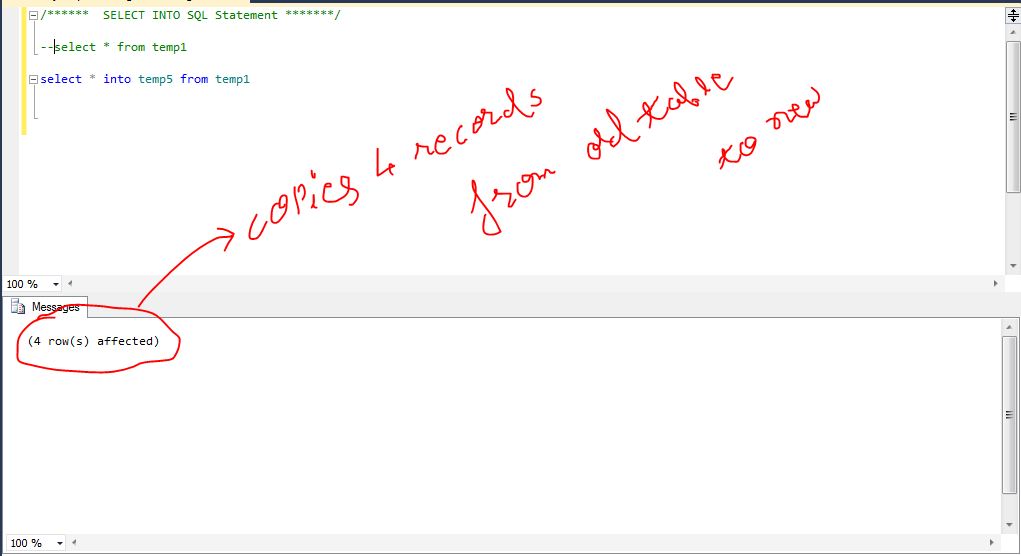
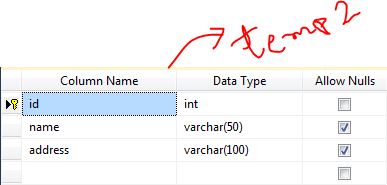
let me start with creating sample tables.

so we can apply the MERGE logic on the tables.

After creating source and target tables I will use ID column to determine whether or not a row from the Source should update or insert a row in the Target table.
I want to use merge logic to update the Target table anytime there are matching rows between the Source and Target table based on the ID column values.
but based on the ID column if any rows in the source table do not match with the target table rows, then Insert operation will be performed.

in the MERGE statement in the Target table is the table that is referenced right after the MERGE keyword.
the Source table of the MERGE statement is reference right after the USING keyword.
In example I joined these two table based on the tagid column, to determine if a record in order to identify the records to be inserted or updated the ON clause is used to join the records between the Target and Source tables, just like you would do in a normal JOIN operation.
I joined two tables based on the tagid column, to determine if a record in the Target table should be updated or inserted the When clauses are used. The two When clauses in this example have two different criteria.
The first query “When Matched”, and the second query “When Not Matched”. 
the “When Matched” option the action to perform when a record in the Source table matches a record in the Target table based on the ON condition.
if the “When Matched” criteria is met then the code will use column information in the matched Source table record to update the matching record in the Target table.

————————————————————————————————————
INSERT In MERGE Statement
————————————————————————————————————

If a row in the Source table does not match to a record in the Target then the “When Not Matched” logic will be used to insert a record into the “Target” table, based on the column information in the “Source” table for the unmatched row.
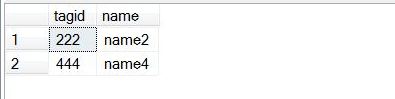
Target Table Before.


Target Table Before MERGE statement execution.

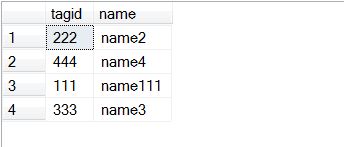
by reviewing the results in above images you can see that the TargetTables for the row with two tagid s of 111, 333 were inserted into Target table because the row with an tagid from SourceTable to TargetTable did not match with Not Matched condition.

————————————————————————————————————
UPDATE In MERGE Statement
————————————————————————————————————

Let’s Work on Update condition from the MERGE Statement.
I am changing the value of tagid 1 from name1 to name11.

The Source Table with updated value.

Let’s run the MERGE Statement again.

Target Table Before the update condition from MERGE statement.

Target Table Before the update condition from MERGE statement.

by reviewing the result images, you can see that the Target table for the row with an tagid of 111 was updated from name1 to name111. This was accomplished because an tagid column value of 111 met the WHEN MATCHED condition, which caused the UPDATE statement to be executed that used the name column value from the source table to update the target table.

————————————————————————————————————
DELETE In MERGE Statement
————————————————————————————————————

the MERGE statement can perform more just an INSERT and UPDATE against the Target table, it can also perform DELETE operations.
let’s suppose we need to build a process that needs to maintain a table that contains all the records in a source system.
if we are inserting , updating and deleting records in source system, you will have to do the same insert, update and delete in the target from the source.
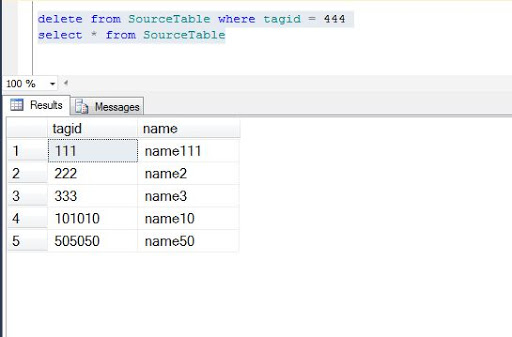
to explain I will delete one record from SourceTable, and I will execute the MERGE statement to check that MERGE can delete the same record from the TargetTable.
this is the initial values in both Source and Target tables.
now my first step is to delete record of tagid 444 from SourceTable.
second step is to run runn MERGE Statement, and after execution of MERGE we should not get the record of tagid 444 from TargetTable.
Step1:
Step2:
above image shows the TargetTable without having a tagid 444.
meaning we are successfully able to perform DELETE operation using MERGE.

————————————————————————————————————
OUTPUT Clause In MERGE Statement
————————————————————————————————————

OUTPUT Clause is used in MERGE statement to display information about what values that were updated, inserted or deleted.
I will Insert and Update records in Source table to demonstrate how to use the OUTPUT clause.
above image shows the OUTPUT Clause with MERGE Statement.
Step1:
Inserting, Updating values from source table to identify and demonstrate use of OUTPUT Clause.
I have inserted two values with tagid 444, and 999.
I have updated value of tagid 505050.
I have deleted one row with tagid 101010.
in the result output we should be getting these three values in INSERTED and DELETED 
Step2:
Execution of MERGE Statement.

the OUTPUT clause that I addes uses the “inserted” and “deleted” pseudo tables to displays the tagid’s for those rows that where inserted or deleted, as well as displays whether an INSERT, UPDATE, DELETE statement was done by reference the $action notation. 
by reviewing the output, you can see that four different statements were executed. For each statement executed the tagid values for the inserted and deleted pseudo tables were displayed. 
Only the UPDATE statement contains a tagid value in both inserted and deleted pseudo tables. These two values represent the before and after images of the tagid column when the UPDATE operation was performed.

————————————————————————————————————

TOP Clause In MERGE Statement
————————————————————————————————————

the MERGE Statement supports also a TOP clause. using the TOP clause on MERGE statement is just like using TOP clause on SELECT statement. when you used the TOP clause, SQL server will not more rows than the number supplied with the TOP clause.

for more information Please refer MSDN BOL.

DBCC Commands in SQL Server: Part 3

22. DBCC CleanTable

Reclaims space from dropped variable-length columns in tables or indexed views.

a variable-length column can be one of the following data types:

  • varchar
  • nvarchar
  • varchar(max)
  • nvarchar(max)
  • varbinary,
  • varbinary(max)
  • text,
  • ntext,
  • image,
  • sql_variant and xml

this command does not reclaim space after a fixed-length column is dropped.

user must own the table or indexed view, or be a member of the sysadmin fixed server role, the db_owner fixed database role, or the db_ddladmin fixed database role.

for all the options with this command, please refer MSDN BOL.

DBCC CleanTable

————————————————————————————————————

23. DBCC ShrinkDatabase

shrinks the size of the data and log files in the specified database.

1.

shrinking a database and specifying a percentage of free space

following image decreases the size of the data and log files in the Test user database to allow for 10 percent free space in the database.

2.

truncating a database

above image shrinks the data and log files in the Testdatabase database to the last allocated extent.

for all the options with this command, please refer MSDN BOL.

DBCC ShrinkDatabase

————————————————————————————————————

24. DBCC ShrinkFile

shrinks the size of the specified data or log file for the current database, or empties a file by moving the data from the specified file to other files in the same filegroup, allowing the file to be removed from the database.

user can shrink a file to a size that is less than the size specified when it was created.

this resets the minimum file size to the new value.

following script helps to find the file names we need to use for DBCC shrinkfile command.

select * from sys.database_files


1.

shrinking a data file to a specified target size

above image shrinks the size of a data file named Test in the Test user database to 5 mb.

2.

shrinking a log file to a specified target size

the following example shrinks the log file in the Test database to 1 mb.
to allow this command to shrink the file, the file is first truncated by setting the database recovery model to simple.

3.

truncating a data file.

the following example truncates the primary data file in the Test database.
the sys.database_files catalog view is queried to obtain the file_id and filename of the data file.

4.

Emptying a file

the following example demonstrates the procedure for emptying a file so that it can be removed from the database.
for the purpose of this example, a data file is first created and it is assumed that the file contains data.

to execute the command user requires membership in the sysadmin fixed server role or the db_owner fixed database role.

for all the options with this command, please refer MSDN BOL.

DBCC Shrinkfile

————————————————————————————————————

25. DBCC updateusage

reports and corrects pages and row count inaccuracies in the catalog views.
these inaccuracies may cause incorrect space usage reports returned by the sp_spaceused system stored procedure

1.

updating page or row counts or both for all objects in the current database

the following example specifies 0 for the database name and DBCC updateusage reports updated page or row count information for the current database.

2.

updating page or row counts or both for the Account table.

The following example reports updated page or row count information for the Account table in the Test database.

3.

updating page or row counts or both for a specific index in a table.

the following example specifies PK_Address as the index name.

for all the options with this command, please refer MSDN BOL.

DBCC UpdateUsage

————————————————————————————————————

26. DBCC Freeproccache

this commands removes all elements from the plan cache, removes a specific plan from the plan cache by specifying a plan handle or SQL handle, or removes all cache entries associated with a specified resource pool.

it requires ALTER SERVER STATE permission on the server

1.

clearing a query plan from the plan cache.

the following example clears a query plan from the plan cache by specifying the query plan handle.
to ensure the example query is in the plan cache, the query is first executed.
the sys.dm_exec_cached_plans and sys.dm-exec_sql_text dynamic management views are queried to return the plan handle for the query.
the plan handle value from the result set is then inserted into the DBCC freeproccache statement to remove only that plan form the plan cache.

using Plan_handle to use as argument in FREEPROCCACHE.


2.

clearing all cache entries associated with a resource pool.

the following example clears all cache entries associated with a specified resource pool.
the sys.dm_resource_governor_resource_pools view is first queried to obtain the value for pool_name

for all the options with this command, please refer MSDN BOL.

DBCC FreeProccache

————————————————————————————————————

27. DBCC TraceON

enables the specified trace flags.

argument lists:

trace#: is the number of the trace flag to turn on.
n: is a placeholder that indicates multiple trace flags can be specified.
-1: switches on the specified trace flags globally.

requires membership in the sysadmin fixed server role.

for all the options with this command, please refer MSDN BOL.

DBCC TraceON

————————————————————————————————————

28. DBCC TraceOFF

disables the specified trace flags.

requires membership in the sysadmin fixed server role.

for all the options with this command, please refer MSDN BOL.

DBCC TraceOFF

————————————————————————————————————

DBCC Commands in SQL Server: Part 2

12. DBCC InputBuffer

the command displays the last statement sent from a client to an instance of Microsoft SQL Server.

to execute a command user must be a member of the sysadmin fixed server role.
user must have view server state permission
option session_id must the same as the session ID on which the command is being run.

To determine the session ID execute the following query.

SELECT @@spid;

for all the options with this command, please refer MSDN BOL.

DBCC InputBuffer

————————————————————————————————————

13. DBCC OpenTran

Displays information about the oldest active transaction and the oldest distributed and non distributed replicated transaction, if any, within the specified database.

results are displayed only if there is an active transaction or if the database contains replication information.

An informational message is displayed if there are no active transactions.

it requires membership in the sysadmin fixed server role or the db_owner fixed database role.


for all the options with this command, please refer MSDN BOL.

DBCC OpenTran

————————————————————————————————————


14. DBCC OutputBuffer

returns the current output buffer in hexadecimal and ASCII format for the specified session_id.

DBCC OutputBuffer (62) — 62 is session_id

it requires membership in the sysadmin fixed server role.


for all the options with this command, please refer MSDN BOL.

DBCC OutputBuffer

————————————————————————————————————

15. DBCC ProcCache

displays information in a table format about the procedure cache.
 to execute this command, it requires membership in the sysadmin fixed server role or the db_owner fixed database role.


for all the options with this command, please refer MSDN BOL.

DBCC Proccache

————————————————————————————————————


16. DBCC Show_Statistics

this command displays current query optimization statistics for a table or indexed view.
the query optimizer uses statistics to estimate the number of rows in the query result, which enables the query optimizer to create a high quality query plan.

it does not provide statistics for spatial or xVelocity memory optimized columstore indexes.

DBCC Show_Statistics (Account, PK_Account)

it accepts two parameters: first is Table name and second is index on particular column


in order to view the statistics objects, the user must be owner of the table or the user must be a member of sysadmin fixed server role, the db_owner fixed database role, or the db_ddladmin fixed database role.

for all the options with this command, please refer MSDN BOL.

DBCC Show_statistics

————————————————————————————————————

17. DBCC SQLPerf

Provides transaction log space usage statistics for all databases.

it can also be used to rest wait and latch statistics.
Latches are lightweight internal structures used by SQL Server database engine to ensure physical data integrity.
the large majority of latches are acquired when a data page is moved from the storage engine to the data cache but there are latches that are used for other types of synchronization.

DBCC SQLPerf (LOGSPACE)

LOGSPACE is argument we use to get the current size of the transaction log and the percentage of log space used for each database.

To run this command requires View Server State Permission on the server. To reset wait and latch statistics requires Alter Server State permission on the server.

for all the options with this command, please refer MSDN BOL.

DBCC SqlPerf

————————————————————————————————————

18. DBCC TraceStatus

Displays the status of trace flags.

DBCC TRACESTATUS(-1);

Displays the status of trace flags that are enabled globally.
if -1 is specified without tracenumber, all the global trace flags that are enabled are displayed.

requires membership in the public role.

for all the options with this command, please refer MSDN BOL.

DBCC TraceStatus

————————————————————————————————————

19. DBCC UserOptions

returns the SET options active for the current connection.

requires membership in the public role.

for all the options with this command, please refer MSDN BOL.

DBCC Useroptions

————————————————————————————————————

20. DBCC Checkfilegroup

checks the allocation and structural integrity of all tables and indexed views in the specified filegroup of the current database.

DBCC Checkfilegroup ()

Requires membership in the sysadmin fixed server role or the db_owner fixed database role.

for all the options with this command, please refer MSDN BOL.

DBCC Checkfilegroup

————————————————————————————————————

21. DBCC CheckIdent

checks the current identity value for the specified table in SQL Server 2012 and, if it is needed, changes the identity value.
You can also use the command to manually set a new current identity value for the identity column.

1. Checks Current Identity Value

    DBCC CHECKIDENT (“Person.AddressType”, NORESEED);

2. Resets current identity value, if it is needed.

    DBCC CHECKIDENT (“Person.AddressType”);

3. forces current identity value to a new value

    DBCC CHECKIDENT (“Person.AddressType”, RESEED, 10);

to execute the command user must own the table, or be a member of the sysadmin fixed server role, the db_owner fixed database role, or the db_ddladmin fixed database role.

for all the options with this command, please refer MSDN BOL.

DBCC CheckIdent

————————————————————————————————————

DBCC Commands in SQL Server: Part 1

Microsoft provides a set of commands that will help you, called the DBCC commands. meaning Database Consistency Checker commands.

These commands are divided into four categories:

  • Status
  • Validation
  • Maintenance
  • and miscellaneous

these commands change slightly or replaced with each higher version of SQL Server.
DBCC CheckDB
DBCC Commands can be most valuable friend

  • It helps to check integrity of your SQL tables and their related indexes.
  • Check the whole SQL database.
  • Check the integrity of SQL database pages.
  • It rebuilds the indexes on any given SQL table.
DBCC Commands are necessary, why because of these reasons.
  • Database pages (both tables and indexes) need to be split from time to time, which can result in bad allocation.
  • The SQL Server engine can occasionally misunderstand your intentions.
  • In situations where a large number of updates is the norm, things can get messy (when you update it actually deletes plus an insert)
  • To individual pages, may lose their optimal storage footprint.
How you use DBCC
you can run DBCC in two ways: from a command window and from inside a Query Analyzer Window.
you can also schedule an operation, if you deem it necessary.
Let’s start looking at the commands.
————————————————————————————————————
1. DBCC ShowContig
this command shows you how a table, view or index is fragmented.
fragmentation is the non continuous placement of data, it shows why the how the SQL Server is show.
for example.
DBCC ShowContig ([Account])


the image shows, the statistics of Account table on the server.
the most important piece of information is the Scan Density. The closer this number is 100, the more contiguous the data.
for all the options with this command, please refer MSDN BOL.
——————————————————————————————————–
2. DBCC CheckDB
checks the consistency of the entire database, and is the basic method to check for database corruption.
it checks the logical and physical integrity of all the objects in the specified database by performing these operations.
  • CheckTable
  • CheckAlloc
  • CheckCatalog

for all the options with this command, please refer MSDN BOL.
————————————————————————————————————
3. DBCC CheckTable
Checks the integrity of all the pages and structures that make up the table or indexed view.
for all the options with this command, please refer MSDN BOL.
————————————————————————————————————
4. DBCC CheckAlloc
Checks the consistency of disk space allocation structures for a specified database.
for all the options with this command, please refer MSDN BOL.
————————————————————————————————————
5. DBCC CheckCatalog
Checks for catalog consistency withing the specified database.
the database must be online to use this command.
it Requires membership in the sysadmin fixed server role, or the db_owner fixed database role.
for all the options with this command, please refer MSDN BOL.
————————————————————————————————————
6. DBCC CheckConstraints
Checks the integrity of a specified constraint or all constraints on a specified table in the current database.
Requires membership in the sysadmin fixed server role or the db_owner fixed database role.

for all the options with this command,please refer MSDN BOL.
————————————————————————————————————
7. DBCC DBReindex
Rebuilds one or more indexes for a table in the specified database.
default to members of the sysadmin fixed server role, the db_owner and db_ddladmin fixed database roles, and the table owner, and are not transferable.
syntax
this example rebuilds the index (Optional) with fill factor of 80 on the particular table in the particular database.
DBCC DBReindex (‘AdventureWorks2012’,”, 80) 
for all the options with this command, please refer MSDN BOL.
————————————————————————————————————
8. DBCC DropCleanBuffers
removes all clean buffers from the buffer pool.
requires membership in the sysadmin fixed server role.
for all the options with this command, please refer MSDN BOL.
————————————————————————————————————
9. DBCC ErrorLog
cycles or force a new error log to be created.
you can restart your SQL Server to achieve this task.

you can also use the stored procedure sp_cycle_errorlog to accomplish the same task by issuing the following:

Exec sp_Cycle_Errorlog

————————————————————————————————————

10. DBCC FlushProcInDB

this command is used to clears all plans for a single database.

for example, the following code, will clear all the plans for ‘test‘ database and force to recompile all stored procedures on first execution.

this command is undocumented and unsupported by Microsoft.

————————————————————————————————————

11. DBCC IndexDefrag

Defragments indexes of the specified table or view.
indexed could be clustered and secondary indexes of the specified table or view.

Indexdefrag can not be used to defragment the following indexes:

  • A disabled index.
  • An index with page locking set to OFF.
  • A spacial index.
  • Not supported for use on system tables
example 
DBCC INDEXDEFRAG (Test, Acount, CustomersOrders)
GO
Caller must own the table, or be a member of the sysadmin fixed server role, the db_owner fixed database role, or the db_ddladmin fixed database role.
for all the options with this command, please refer MSDN BOL.

————————————————————————————————————

How to Debug SSIS Package

What Debug means?

In simple words debugging means we are simply trying to find the errors or problems in our programs.
so in SSIS we try to find problem and error in our package (Task Container).
in SSIS it is a process we perform on DFT, and containers.

so the question is
how do we debug our SSIS package?

so the answer is we can setup a breakup point in a package, a task, a For Each Loop Container, a For Each Loop Container, or a Sequence Container.

To set breakpoints in a package, a task, or a container.

1. open the package. so for this post I have one package called TestPkg.

2. there are two ways to set up break point.

    1. Use F9 button put the cursor debugging.

or you can go with the second option.

    2. To set breakpoints in the package object, click the Control Flow tab, place the cursor anywhere on         the background of the design surface, right -click and then click on Edit Breakpoints.


you can Enable as many required break conditions depending on the requirement you have.

the hit count type and the hit count number for each breakpoints optionally, it is not mandatory.

To set breakpoints in a package control flow, click the Control Flow tab, right click a task, a For Loop Container, a Foreach Loop Container, or a Sequence Container, and then click Edit Breakpoints.

once you set up the break point, you can see the cursor as a red mark on DFT.

the hit count type and the hit count number for each breakpoints optionally, it is not mandatory.

To set breakpoints in an event handler, click the Event Handler tab, right click on a task, or Loop Containers and then click Edit Breakpoints.

Deploying a SSIS Package on Target Machine

we can deploy the SSIS package in in three ways.

The easiest way is File system to deploy the package.
in easy and understandable words, SSIS package actually is XML file, what deployment does is copies SSIS package with the configuration and paste it at given specific place. The place could be anywhere out of three. First is MSSQLSERVER/DTS/Packages, second is in MSDB database, and third is in Package store.

Let’s start with example.
there are three ways to deploy a SSIS package.

1. Deployment utility from SSIS package itself.
2. by using DTUTIL.exe command utility provided by SQL Server.
3. using SSMS (Management Studio)

using SSIS Package deployment Utility

by using this utility Microsoft SSIS technology creates SSIS Package installer in your installation folder.
with using this utility you will get one Manifest file, where your current project is.
the path will be
c:\\yourfolder\projectname\bin\Deployment

let’s see the process.

if the project is not open, open it and select properties of project.

let’s create one test package.

select properties of the package and you will get this page.

as you can see the option CreateDeploymentUtility is set to False.
and we have default path as well, which is bin\Deployment

to deploy our package we have to set the property CreateDeploymentUtility to True.

and Apply it.

once you build your package and run it.
now once you build and run the package you will get the Manifest file along with the package.

my package is stored in this folder

c:\folder\SSIS\TestPkg\


in bin folder you will get Deployment and package itself.


the below image shows the content of Deployment folder which are package itself and one manifest file.

so to perform the deployment you will have to copy and run the Manifest file on to the target machine.
and there you go you package will be in the target machine with configuration file and everything.

————————————————————————————————————————————————————————————————————————

Second way is to use DTUTIL.exe

SQL Server gives an utility which does deployment, but it command line statement.
the utility is DTUTIL, and it can be used only by command prompt.

in the coming example, I will show how to deploy a TestPkg.dtsx package to the file system, package store or SQL Server.

To deploy to the file system, you can use DOS copy command or DTUTIL command

the given example shows the command line to deploy the package to the File System using DTUTIL command.

dtutil / TestPkg.dtsx /Copy File;C\Yourfolder\TestPkg.dtsx

To deploy a package to a Package Store, use this command.

dtutil / TestPkg.dtsx /Copy DTS; TestPkg.dtsx

To deploy a package to a SQL Server, use this command.
this command will deploy the package to your local macine’s default SQL Sever instance.

dtutil / TestPkg.dtsx /Copy SQL;TestPkg.dtsx

if you are deploying your package to different SQL Server instance you need to add this in your command.

/DestinationServer “Servername\yourInstanceName”

————————————————————————————————————————————————————————————————————————

Third way is to use SSMS (Management Studio) itself.

just logon to the Intergration services in SSMS.

remember that the integration services should be running into the system.

so the intial screen you will get is.


so once you enter into the SSMS, you should be getting this below screen.


As you can see in above image, there are two nodes under the Stored Procedure.
File System and MSDB.
File System is the package store with the default location in SQL Server 2008 r2.
the location is C:\Program Files\Microsoft SQL Server\90\DTS\Packages.
MSDB is the MSDB database.

here I wil show the deployment the TestPkg.dtsx package from the location in to the project folder to the package store.
and to the MSDB database.

To Deploy the package to the package store, just right click on the File System and select the option Import Package from the menu.


select package path to get the package.

give the package name and press OK to import the package.

To Deploy the package to the MSDB Database, just right click on the MSDB and select the option Import Package from the menu.


That’s about it..
Good Luck.. Try out Deploy the packages..

Generate Flat file with Month name in it using SSIS Expression.

What you do if some one asks to generate flat file with Month in it.
the format of file we want is FileName_Oct_2012.txt
Now as I showed you in my earlier post, about generating flat file with time stamp.
generating file with time stamp is pretty easy, because we have function and cast operator for it to help us.
but what if we want month name, and year instead of the whole time stamp.
I have already created flat file using time stamp so I will be using my previous post
and modifying some of the code.
SSIS does not give any particular function to extract month name directly, although it gives MONTH() function to give us the month number. so by using that function we will generate the month name.
let’s start then.
I took one variable which is varMonthName to save month name.

write these expression in the variable expression area.

(month(getdate()) == 1? “Jan”:
month(getdate()) == 2? “Feb”:
month(getdate()) == 3? “Mar”:
month(getdate()) == 4? “Apr”:
month(getdate()) == 5? “May”:
month(getdate()) == 6? “Jun”:
month(getdate()) == 7? “Jul”:
month(getdate()) == 8? “Aug”:
month(getdate()) == 9? “Sep”:
month(getdate()) == 10? “Oct”:
month(getdate()) == 11? “Nov”:
month(getdate()) == 12? “Dec”:””)

Now I am using the created variable varMonthName in my variable strFileName.

and there you go. you will get the file name in this format.
FileName_Oct_2012.txt

try this out..
Good Luck…

Split Flat FIle data and Load into Parent and Child SQL tables

Let’s say we have Denormalized data (coming from a file) that needs to be imported into parent-child tables. 
for example.
the source flat file looks like this.


the file has tab delimiter between the columns.

Now let’s create the parent table and child table to load this source file.

ParentTable


CREATE TABLE [dbo].[ParentTable](
[ParentId] [int] IDENTITY(1,1) NOT NULL,
[Account] [varchar](12) NULL,
[Name] [varchar](50) NULL,
 CONSTRAINT [PK_parentCon] PRIMARY KEY CLUSTERED 
(
[ParentId] ASC
)WITH (PAD_INDEX = OFF, STATISTICS_NORECOMPUTE = OFF, IGNORE_DUP_KEY = OFF, ALLOW_ROW_LOCKS = ON, ALLOW_PAGE_LOCKS = ON) ON [PRIMARY]
) ON [PRIMARY]


ChildTable

CREATE TABLE [dbo].[ChildTable](
[ChildId] [int] IDENTITY(1,1) NOT NULL,
[ParentId] [int] NULL,
[Street] [varchar](50) NULL,
[City] [varchar](12) NULL,
[Zip] [varchar](12) NULL,
[Email] [varchar](50) NULL,
 CONSTRAINT [PK_childCon] PRIMARY KEY CLUSTERED 
(
[ChildId] ASC
)WITH (PAD_INDEX = OFF, STATISTICS_NORECOMPUTE = OFF, IGNORE_DUP_KEY = OFF, ALLOW_ROW_LOCKS = ON, ALLOW_PAGE_LOCKS = ON) ON [PRIMARY]
) ON [PRIMARY]


Now we have a DDL statements for ChildTable and ParentTable, let’s design a SSIS package.

SSIS package with name ParentChild.dtsx.
and 


above image shows two Data flow task in Control flow.
one is Parent and another is Child

the connection managers we will be using are given below.


I have already shown the source flat file format.
you can embed into the flat file connection manager by creating flat file with the data.

how we use Flat File connection manager.


After having set up flat file connection manager, let’s go for Data flow task we have put on our Control Flow task.

which are Parent and Child

let’s look at Parent DFT, what we will be having in it.
we will have Flat file source, Sort transformation, and OLE DB destination.


Flat File Transformation Step

1.


2.


Let’s have Steps for Sort Transformation.

1.


Let’s have steps for OLE DB Destination.

1.


2.


let’s look at Child DFT, what we will be having in it.
we will have Flat file source, LookUp transformation, and OLE DB destination.


let’s see what we will be using in Flat File Source Transformation
steps are given below.

1.


2.


we have now source as a flat file.
now let’s take LookUp Transformation.

steps are given below.

1.


2.


3.


now that we have LookUp transformation set it up, let’s have the final transformation which is OLE DB Destination  Transformation to Load Data to Child Table.

while connecting LookUp Transformation to OLE DB Destination transformation use LookUp Match Output as a result from LookUp Transformation to Input for OLE DB Transformation.

let’s have steps here for OLE DB Destination Transformation.

1.


2.


Now we have everything required input and destination table with us.

let’s run the package.

1.


2.


3.


4.


You can see the ParentTable and ChildTable with data.

Good Luck with your Parent and Child table loading.

Create Dynamic Text file with Timestamp with it using SSIS

in my last post I explained how to create text file (flat file) using SSIS.please find given link to generate text file.Create fixed width text file using Flat file Destinationin this post I will show you how to generate flat file with date time stamp.some time we need to generate files according to incoming data.
let’s say we are getting data in every 30 minutes.
and you have to save every file, you can not over write file.
so if you have situation where you can over write file data, you can use getdate functionality with variable and attach it with filename.

but here we will use some another technique to generate file with no over write option.

take Data flow task

Define two variable:
strFile:

scope: Package
Data type: String

set the expression in variable’s property like this.

use this expression

“c:\\Folder\\FileName” + (DT_WSTR, 30)  (DT_DBDATE) GETDATE() + “.txt”

strFileName:

scope: Package
Data type: String


Expression is:

“c:\\Folder\\FileName” + (DT_STR,4,1252) DatePart(“yyyy”,getdate()) +
Right(“0” + (DT_STR,4,1252) DatePart(“m”,getdate()),2) +
Right(“0” + (DT_STR,4,1252) DatePart(“d”,getdate()),2) +

“-” +

Right(“0” + (DT_STR,4,1252) DatePart(“hour”,getdate()),2) +
Right(“0” + (DT_STR,4,1252) DatePart(“minute”,getdate()),2) +
Right(“0” + (DT_STR,4,1252) DatePart(“second”,getdate()),2) + “.txt”

and you are all set.
run the package.
and you will the desired result as filename variation.

Good Luck…

Create Fixed Width Text File using Flat File Destination using SSIS

The easiest thing is to create text file using Flat file connection manager.we can load data to text file, but problem is we get data in asymmetric format. which we do not want every time, should be in fixed column size.

so the difficulty arise when we need to create file with fixed width column size.

let’s go through the process. let’s create package called Test.

I suppose you will be having knowledge of TSQL and SQL Server Technologies.

SQL Server Technologies like SSIS (SQL Server Integration Services) After opening Integration Services in
SQL Server Data Tools we will be putting Data flow task to load data into the text file.

Step1:

Step2:
in second step we are taking OLE DB Source, Derived Column, and Flat File destination.
i will explain every transformation with reason.
the first transformation is OLE DB Source to take AdventureWorks2012 database, the table i will use is [HumanResources].[Department]. You can find same table and database with SQL Server version 2008, and 2008R2.
open OLE DB Source editor and select AdventureWorks2012 database and [HumanResources].[Department] table as source.
second transformation is Derived Column. 
as i said before we can load data with only two transformations, one is OLE DB Source and second is Flat File Destination.
but we have different situation here, we just don’t want to load data in asymmetric position.
so we have Derived column as a solution.
in figure we can see that I have created four columns using Add as New column, specifically assigned lengh of output string.
so whenever we get our output it will be in these length formats.
Final Step is to Load data into flat file destination.
we will map the source columns and destination output columns.
the columns we have created using derived columns, we will use them as a source columns.
we will map them with output columns.
and we are set.
run the package, and the file we will be getting as output is given below.
not hoping that, you get the situation like this.
And hope that this blog will help you to resolve the situation.
Good Luck…

What are Constraints in SQL Server and Why we use them? PART 1

What are Constraints in SQL Server?

We use constraints in SQL Server to enforce integrity or set of rules in SQL Server tables or databases.

Constraints are used to limit the type of data that are inserted into a table.

there are some specific Constraints we use in SQL Server which are given below.

  • Not Null
  • Unique
  • Primary Key
  • Foreign Key
  • Check
  • Default
we will understand  each constraint one by one with example.
Let’s take NOT NULL First
1. NOT Null
in SQL server if we do not insert any value into table, SQL server takes NULL values by default.
so NOT NULL Constraint prevents user not to leave any BLANK record in table.
with NOT NULL constraint a user has to insert any value.
It enforces a table column to NOT accept NULL values.
Syntax for example:
we implement this constraint when we create table.
create table tablename
(
somecolumnname1 int NOT NULL
somecolumnname2 varchar(30) NOT NULL
)
we have two columns here column1, and column2 which are having NOT NULL constraint on them.
so we will try not to insert values into both columns to see how this constraint works.
as we can see here I am not inserting into column1, and column2 which has NOT NULL constraint on them.
so the insert fails. because of this constraint.

2. SQL UNIQUE

The UNIQUE constraint uniquely identifies each record in a database table.
The UNIQUE and PRIMARY KEY constraints both provide a guarantee for uniqueness for a column or set of columns.
the Difference between UNIQUE and Primary Key Constraint is UNIQUE constraint allows One NULL
and Primary key does not.
A PRIMARY KEY constraint automatically has a UNIQUE constraint defined on it.
You can have many UNIQUE constraints per table, but only one PRIMARY KEY constraint per table.

syntax for example.

CREATE Table
(
columnname1 int UNIQUE,
columnname2 varchar(50) NOT NULL
)

another way to apply UNIQUE Constraint…

UNIQUE Constraint in Work

in UniqueExample we have one record with pid = 1
now if we add another record we should get an error saying that we are trying to insert another duplicate record with same pid 1.

that means the record should be unique.

Allows one NULL if you have Unique Key constraint set on column.

3. PRIMARY KEY

Primary key constraint uniquely identifies a record in table.

it does not allow NULL values as a record.

Primary key Does not allow NULL Value.

Now lets insert duplicate values to validate Primary Key Constraint.

lets insert another record with same pid = 1.

SQL SELECT INTO Statement

SELECT INTO Statement

select into statement is used to copy data records (Result Set) or insert into one table from another different table.

syntax for example

SELECT * INTO newtable from oldtable where “Expression”

we will copy the whole table temp1 into new table temp5.
note that we have not created table temp5.
using CREATE TABLE statement.
what SELECT INTO statement does is it creates new table by copying the structure with the data from old table.

Let’s take some different example of select into statement.

here we are providing search expression where name is ‘name3’ from table temp1.

UNION and UNION ALL in SQL Server

UNION in SQL Server

UNION

UNION is used to combine two or more result sets of SELECT statements

the condition to combine two or more select statements, the two tables should have same number or columns with the same data types.

syntax with example.

SELECT column1, column2 from table1
UNION
SELECT column1, column2 from table2

Note in above images data types of both tables are same
id is int, name is varchar, and address is varchar.
UNION gets always unique combination of columns provided in select statements.
For example:
in temp1 table we have name1 with address1, but in temp2 table we have name1 with address3 so will be unique combination. so as a result we will get two records as combination.
Likewise for other records.
UNION ALL


Union All combines all the records from two or more select statements.
syntax with example:
SELECT columnname1, columnname2 from table1
UNION ALL
SELECT columnname1, columnname2 from table2